Linux下查找文件内容
find ../../../ -name “*.php” -type f -print| xargs grep -i “the key is wrong”
腾讯云挂载Linux云盘
使用“fdisk -l”命令查看数据盘相关信息。
使用“df -h”命令,无法看到未分区和格式化的数据盘。
fdisk /dev/vdb
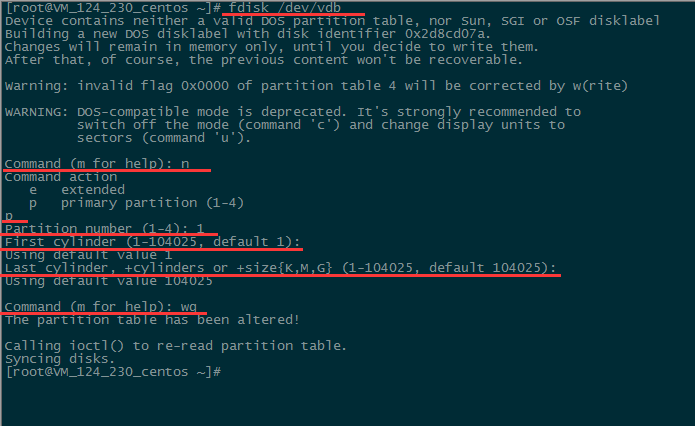
使用“fdisk -l”命令,即可查看到,新的分区vdb1已经创建完成。
mkdir /log
mount /dev/vdb1 /log
echo ‘/dev/vdb1 /log ext3 defaults 0 0’ >> /etc/fstab
一篇很不错的PhoneGap环境搭建的文章
http://www.cnblogs.com/qzhforthelife/p/3660103.html
/lib/ld-linux.so.2: bad ELF interpreter: 没有那个文件或目录
yum install glibc.i686
CentOS 7.0 64位安装Memcached
首先,安装需要的依赖项 libevent 和 libevent-dev
yum install libevent libevent-devel
然后去 memcached.org 下载对应的版本的memcached:
http://memcached.org/
当然也可以直接下载最新的包
wget http://memcached.org/latest
然后解压 tar -zxvf
编译安装
./configure --prefix=/usr/local/memcached
如果是64位的centos 可以执行如下命令
./configure  --prefix=/usr/local/memcached --enable-64bit
make
make install
如果编译失败,error: no acceptable C compiler found in $PATH 则先安装gcc
yum -y install gcc
然后就可以用如下指令启动了
/usr/local/memcached/bin/memcached -d -u root -m 512 -p 11211
[转载] Unity调用IOS相关接口获取手机型号(CSharp)
实现简单的效果:点击Button,调用IOS AlertView,并显示硬件型号
具体实现:在脚本中定义2个外部方法,一个为弹出AlertView的,另一个则为返回字符串的
GUI中创建一个Button,并在点击时弹出调用外部函数,达到弹框效果
在C-Sharp定义了一个外部方法
DllImport(“__Internal”) 和extern是关键点
以下是C-Sharp脚本代码
- using UnityEngine;
- using System.Collections;
- using System.Runtime.InteropServices;
- public class Test : MonoBehaviour {
- private static string _buttonTitle = “press!!!!”;
- [DllImport (“__Internal”)]
- private static extern string _getDeviceName();
- [DllImport (“__Internal”)]
- private static extern void _showAlertView(string str);
- // Use this for initialization
- void Start () {
- if(Application.platform==RuntimePlatform.IPhonePlayer)
- {
- print(“Unity:”+_getDeviceName());
- }
- }
- void OnGUI ()
- {
- if (GUI.Button(new Rect (15, 10, 450, 100),_buttonTitle))
- {
- _showAlertView(_getDeviceName());
- }
- GUIStyle labelFont = new GUIStyle();
- labelFont.normal.textColor = Color.white;
- labelFont.alignment = TextAnchor.MiddleCenter;
- labelFont.fontSize = 30;
- GUI.Label(new Rect(15, 150, 100, 100), _getDeviceName(), labelFont);
- }
- // Update is called once per frame
- void Update () {
- }
- }
将上述脚本绑定至Main Camera,接着Build&Run一下(PS:记得是IOS的)
这时Unity帮我们打开了XCODE,我们需要做的是在里面添加一个新类,我在这用.mm
并在.mm中通过extern “C”标记接口
- #import <Foundation/Foundation.h>
- @interface CustomMethods : NSObject
- @end
- //
- // CustomMethods.mm
- // Unity-iPhone
- //
- // Created by Dale_Hui on 13-12-13.
- //
- //
- #import “CustomMethods.h”
- #import <sys/utsname.h>
- static struct utsname systemInfo;
- extern “C”
- {
- void _showAlertView(const char* str);
- char* _getDeviceName();
- }
- void _showAlertView(const char* str)
- {
- UIAlertView * alertView=[[UIAlertView alloc]initWithTitle:@”Unity交互” message:[NSString stringWithUTF8String:str] delegate:nil cancelButtonTitle:@”确定” otherButtonTitles:nil, nil nil];
- [alertView show];
- [alertView release];
- }
- char* _getDeviceName()
- {
- uname(&systemInfo);
- char* deviceName=(char*)malloc(sizeof(char)*255);
- strcpy(deviceName, systemInfo.machine);
- return deviceName;
- }
- @implementation CustomMethods
- @end
IOS里有个给Unity发送回调方法(异步方法)
- UnitySendMessage(“GameObjectName1”, “MethodName1”, “Message to send”);
三个参数分别为: 对象名,函数名,传递的信息Unity 调用IOS IAP(内购): http://blog.chukong-inc.com/index.php/2012/01/05/unity3d-之iap/
有关extern “C”的解释: http://blog.chinaunix.net/uid-21411227-id-1826909.html
redmine2.6 提交问题时截图粘贴插件
在win7下,用bitnami 搭了个redmine做项目管理软件。bitnami 的 ALL IN ONE 的安装简直爽到爆。
然后吧,就想装个截图粘贴到附件和内容里的插件,但中文搜出来的截图粘贴插件全都是1.2.2 版本的,ORZ。
好吧,果然还是得Google 。
主要是第一个插件,支持2.6 的最新版的redmine,然后我顺便knowledgebase把第二个也装了。 : )
https://github.com/peclik/clipboard_image_paste
https://github.com/alexbevi/redmine_knowledgebase
因为环境问题,里面要的rake命令要附加在bundle exec 之后才能执行
bundle exec rake RAILS_ENV=production redmine:plugins:migrate NAME=redmine_knowledgebase
如果中途遇到问题,可以尝试,bundle update后再执行
最终,插件生效就附在如下图位置上了

以下是途中遇到的各种问题:
——————————-
bundle update 失败。。。
SSL_connect returned=1 errno=0 state=SSLv3 read server certificate B: certificate verify failed (https://rubygems.org/
参考前文:
点击这里
------------------------
Mysql2::Error: Table 'bitnami_redmine.kb_articles' doesn't exist: SHOW FULL FIELDS FROM `kb_articles`):
没有执行rake migrate
——————————-
Mysql2::Error: Access denied for user 'root'@'localhost' (using password: NO)
bundle exec rake RAILS_ENV=production redmine:plugins:migrate NAME=redmine_knowledgebase
Maven+shade 打包运行异常,Configuration problem: Unable to locate Spring NamespaceHandler for XML schema namespace [http://www.springframework.org/schema/context] Offending resource: class path resource [bus/spring/applicationContext.xml]
使用Maven + shade 打包成jar 时,启动应用报如下错误:
org.springframework.beans.factory.parsing.BeanDefinitionParsingException: Configuration problem: Unable to locate Spring NamespaceHandler for XML schema namespace [http://www.springframework.org/schema/context] Offending resource: class path resource [bus/spring/applicationContext.xml]
stackoverflow 查到如下信息:
http://stackoverflow.com/questions/1937767/spring-3-0-unable-to-locate-spring-namespacehandler-for-xml-schema-namespace解决方案:在maven-shade-plugin 的 configuration 的 transformers 中加入spring 打包的 META-INF信息即可
  <plugin>
            <groupId>org.apache.maven.plugins</groupId>
            <artifactId>maven-shade-plugin</artifactId>
            <version>1.4</version>
            <executions>
              <execution>
                <phase>package</phase>
                <goals>
                  <goal>shade</goal>
                </goals>
                <configuration>
                  <transformers>
<!-- 加入以下段落 -->
                      <transformer
                            implementation="org.apache.maven.plugins.shade.resource.AppendingTransformer">
                            <resource>META-INF/spring.handlers</resource>
                        </transformer>
                        <transformer
                            implementation="org.apache.maven.plugins.shade.resource.AppendingTransformer">
                            <resource>META-INF/spring.schemas</resource>
                        </transformer>
<!-- 加入以上段落 -->
                    <transformer implementation="org.apache.maven.plugins.shade.resource.ManifestResourceTransformer">
                      <mainClass>start.StartGameServer</mainClass>
                    </transformer>
                  </transformers>
                </configuration>
              </execution>
            </executions>
          </plugin>
continuum + maven 环境搭建
最近在搭建 continnum + maven 的集成环境,发现当时在FTX 用的时候挺简单,搭建起来还真纠结。
改天把遇到的问题再写个心得list 吧。
另外留一篇不久会用到的资料好了。
http://www.infoq.com/cn/news/2011/06/xxb-maven-9-package
总之这一系列的文章 不错。
Mysql 对 date 修改操作
使用 date_add 方法, 将 datetime 型 的 列 create_date 增加 8小时
  select date_add(create_date, interval 8 hour ) from st_articles
//同理
updatest_articles set create_date =  date_add(create_date,  interval 8 hour ) ;